Are you tired of watching your favorite videos on small screens or dealing with tangled cords and HDMI cables? Say goodbye to these inconveniences by creating custom DVDs with DVD Flick! This free software allows you to combine your favorite videos, audio tracks, and subtitles onto one DVD, making it easy to enjoy your content on any DVD player.
If you’re looking for a powerful yet user-friendly tool for creating custom DVDs, then DVD Flick is definitely worth considering. This open-source software offers an array of features that make it easy to turn your video files into professional-quality DVDs in just a few simple steps.
One of the key benefits of using DVD Flick is its versatility. It supports a vast range of file formats, which means you can work with virtually any type of video content, including WMV, MOV, AVI, and MPEG. Additionally, DVD Flick allows you to create DVDs that are compatible with most standard DVD players, making it an ideal choice for home movie enthusiasts who want to share their creations with friends and family.
Another significant advantage of DVD Flick is its ease of use. Unlike some other DVD authoring tools, this software is designed with simplicity in mind, featuring a streamlined interface that makes it easy to navigate even if you have no prior experience with DVD creation. Whether you need to import video files, create custom menus, or adjust video settings, DVD Flick provides all the necessary tools in one easy-to-use package.
Finally, DVD Flick is entirely free to use, which makes it an attractive option for budget-conscious users. Rather than paying for expensive software or hiring a professional to create DVDs for you, DVD Flick allows you to do it yourself quickly and easily, without spending a dime.
In conclusion, if you’re looking for a versatile, user-friendly, and cost-effective way to create custom DVDs, then DVD Flick is an excellent choice. By taking advantage of its extensive feature set, intuitive interface, and broad compatibility, you can create professional-looking DVDs in minutes, regardless of your level of expertise.
Getting Started with DVD Flick: Installation and Setup
DVD Flick is an excellent tool for creating custom DVDs, and you can get started with it in just a few simple steps. In this section, we’ll take a look at how to install DVD Flick and configure it to suit your needs.
The first step in getting started with DVD Flick is to download and install the software. You can download it from the official DVD Flick website. Once downloaded, run the installation file, and follow the installation wizard prompts to install the software on your computer.
Step 2: Configure DVD Flick Settings
DVD Flick
After installing DVD Flick, you need to configure the settings to customize the software according to your preferences. The software’s default settings are usually suitable for most users, but it is always best to check whether they match your requirements.
To configure the settings, launch DVD Flick and click on “Settings” at the top of the menu bar. In this section, you can adjust various settings like output files, project settings, and encoding settings. It is recommended that you review these settings carefully to ensure that they match your specific needs.
Step 3: Add Videos to Your Project
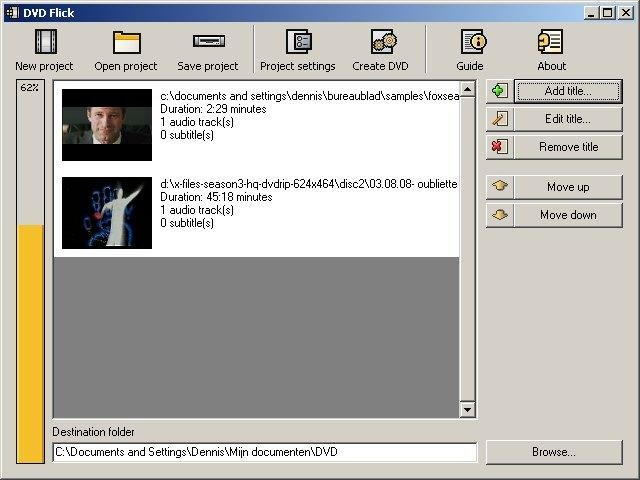
Once you have set up DVD Flick, it’s time to add videos to your project. To do so, click on the “Add Title” button on the main screen, and select the video files you want to include in your DVD project. You can also drag and drop your video files into the DVD Flick window.
Step 4: Customize Your DVD Menu
After adding your videos, you can customize your DVD menu by selecting a template or creating one from scratch. To do so, click on the “Menu Settings” tab and choose a menu template that suits your project. Alternatively, you can create a custom menu using the built-in menu editor.
In conclusion, getting started with DVD Flick is straightforward and easy. By following the steps outlined above, you can install and set up DVD Flick to create custom DVDs that meet your specific needs and preferences.
Exploring the DVD Flick Interface: A Comprehensive Overview
DVD Flick is a free, open-source software that allows you to create custom DVDs in minutes. It boasts an intuitive and user-friendly interface that makes it easy for beginners and professionals alike to navigate and create high-quality DVDs.
Upon starting the program, you’ll be greeted with the main menu, which is divided into several sections. The first section, Project Settings, allows you to configure various settings such as aspect ratio, frame rate, and video format. It also lets you set the target size of your DVD and choose whether to create a DVD or an ISO image file.
The second section, Title Menu, enables you to create custom menus for your DVD. You can add background images, text, and buttons to your menu and customize their appearance and behavior. It’s worth noting that DVD Flick supports both NTSC and PAL video formats, so you can create DVDs that are compatible with different regions.
The third section, Titles, is where you’ll spend most of your time when creating a DVD. Here, you can import videos, arrange them in the desired order, and adjust their properties such as audio tracks and subtitles. You can also preview your videos and make sure they’re playing correctly before burning them to a disc.
The fourth section, Burning, allows you to finalize your project and burn it to a DVD. You can choose the burning speed, select the drive, and even simulate the burning process to check for errors before burning a DVD.
Overall, DVD Flick offers a comprehensive and versatile interface that allows you to create custom DVDs quickly and easily. Whether you’re a novice or a seasoned professional, DVD Flick has everything you need to create impressive DVDs in just a few clicks.
Importing Videos into DVD Flick: Supported File Types and Best Practices
DVD Flick is a powerful tool that allows you to create custom DVDs in minutes. To get started, you need to import your video files into the program. However, not all video file types are supported by DVD Flick, so it’s important to know which ones are compatible.
Supported File Types
DVD Flick supports a wide range of video file formats, including AVI, MPG, MP4, WMV, ASF, MOV, and more. However, keep in mind that the program uses the FFmpeg library to decode video files, so if your video format is not supported by FFmpeg, it won’t work in DVD Flick. Therefore, it’s always a good idea to check the compatibility of your video file.
Best Practices for Importing Videos
To ensure that your videos look their best on the final DVD, it’s essential to follow some best practices when importing them into DVD Flick. Here are some tips:
Use high-quality source files: The quality of your final DVD will depend on the quality of your source files. Therefore, it’s recommended to use high-quality video files with a resolution of at least 720p.
Keep the aspect ratio consistent: Make sure that all of your video files have the same aspect ratio. If not, the DVD Flick will automatically adjust the aspect ratio, which may result in distorted images.
Avoid using copyrighted material: DVD Flick does not support copy-protected or encrypted video files. Therefore, it’s crucial to avoid using copyrighted material in your DVD projects.
In conclusion, importing videos into DVD Flick is a straightforward process as long as you follow the supported file types and best practices. By doing so, you’ll be able to create high-quality custom DVDs that you can enjoy with your friends and family.
Creating Custom DVD Menus: Step-by-Step Guide
One of the best features of using DVD Flick is the ability to create custom DVD menus that make your DVD project look polished and professional. In this step-by-step guide, we’ll walk you through the process of creating a custom DVD menu.
Step 1: Selecting a Menu Template
Start by opening your DVD project in DVD Flick. To create a custom DVD menu, click on the “Menu Settings” button located at the bottom of the main screen. You’ll see a list of pre-designed templates to choose from. Select the one that best suits your project’s theme and goals.
Step 2: Customizing Your Menu
Once you’ve selected a template, you can begin customizing it to suit your needs. You can change the font, background image, button style, and more. DVD Flick allows for a high degree of customization, so take your time and experiment until you’re satisfied with the look and feel of your menu.
Step 3: Adding Buttons and Chapters
Next, it’s time to add buttons and chapters to your menu. You can do this by clicking on the “Edit” button next to the template you’ve selected. Here, you can add text to your buttons, assign them to specific video files, and set chapter points within your videos.
Step 4: Preview and Finalize Your Menu
Once you’ve added all your buttons and made any necessary changes, preview your menu to ensure that everything looks and works as intended. If there are any issues, go back and make further adjustments. When you’re happy with your custom DVD menu, save your project and proceed to burn your DVD.
With DVD Flick, creating a custom DVD menu has never been easier. By following these simple steps, you can create a professional-looking menu that perfectly complements your DVD project. So why wait? Start creating your custom DVD menu today and take your DVD projects to the next level!
Adding Audio Tracks and Subtitles to Your DVDs: Tips and Tricks
One of the most significant benefits is its ability to add audio tracks and subtitles to your DVD project. Whether you want to create a multilingual DVD or enhance the viewing experience for hearing-impaired viewers, DVD Flick makes it easy to incorporate these essential elements into your project.
To add audio tracks to your DVD project, start by clicking on the “Add title” button in the interface and selecting the video file that contains the desired audio track. You can also import separate audio files by clicking on the “Add audio tracks” button and selecting the appropriate file.
Once you have added your audio tracks, you can adjust their order and properties using the “Audio tracks” tab in the DVD Flick interface. Here, you can change the language, format, and volume levels of each track, ensuring that they are perfectly synchronized with your video content.
Adding subtitles to your DVD project is just as easy. To do so, click on the “Add subtitle tracks” button and select the appropriate subtitle file. DVD Flick supports a wide range of subtitle formats, including SRT, SUB, SSA, and ASS, so you can choose the one that best suits your needs.
Like audio tracks, you can customize your subtitles by adjusting their position, font size, and color in the “Subtitle tracks” tab of the DVD Flick interface. This allows you to create professional-looking subtitles that are both functional and aesthetically pleasing.
In conclusion, adding audio tracks and subtitles to your DVD project is a straightforward process with DVD Flick. By following the tips and tricks outlined in this guide, you can ensure that your DVD is accessible to viewers of all backgrounds and abilities. So why not give DVD Flick a try and see how easy it is to create custom DVDs in minutes!
Adjusting Video Settings: Quality, Aspect Ratio, and More
When it comes to creating custom DVDs, adjusting video settings is a crucial step in ensuring that your final product looks and plays exactly as you want it to. DVD Flick offers a range of options for adjusting video quality, aspect ratio, and more, giving you complete control over your project.
One of the most important considerations when adjusting video settings is the aspect ratio. This refers to the proportions of the video image, and it can have a significant impact on how your final product looks. The most common aspect ratios are 4:3 (standard definition) and 16:9 (widescreen), but DVD Flick also supports other aspect ratios depending on your preference.
Another key setting is video quality, which determines the resolution of your final product. DVD Flick allows you to choose from several different quality levels, ranging from low to high, depending on the amount of compression you want to apply to your videos. Keep in mind that higher quality levels will result in larger file sizes and longer burn times.
In addition to aspect ratio and quality, DVD Flick also offers options for adjusting brightness, contrast, and saturation. These settings can be useful for tweaking the appearance of your videos and ensuring that they look their best on any screen.
Lastly, it’s essential to consider audio settings when adjusting video settings. DVD Flick supports a range of audio formats and allows you to adjust the volume level and balance between different channels. By balancing your audio and video settings, you can create a professional-looking and sounding DVD that will impress your audience.
In conclusion, adjusting video settings in DVD Flick may seem overwhelming at first, but with a little experimentation, you’ll quickly learn how to optimize your video quality, aspect ratio, and audio settings to create customized DVDs that look and sound great. With its user-friendly interface and comprehensive set of features, DVD Flick is the ultimate tool for creating high-quality DVDs in just minutes.
Burning Your DVD Project: Finalizing Your Work
After creating your custom DVD project using DVD Flick, the final step is to burn it onto a disc. This process is straightforward and can be completed in just a few simple steps.
First, make sure you have a blank DVD disc ready that is compatible with your DVD player. Insert the disc into your computer’s DVD burner. Open DVD Flick, and select “Project Settings” from the top menu. Here, you can choose the “Burning” option.
In the “Burning” section, you will find several options for burning your DVD project, including choosing the burning speed and selecting the target device. You can also choose whether to create an ISO file, which can be burned onto a disc later, or burn the project directly onto the disc.
Once you have made your selections, click on “Accept.” Next, click on the “Create DVD” button located at the bottom of the interface. DVD Flick will begin encoding your project and then start the burning process. The time it takes to complete this process depends on the size and complexity of your project.
When the burning process is complete, eject the disc and label it appropriately. Your custom DVD project is now ready to play on any standard DVD player.
It’s worth noting that some common issues can arise during the burning process, such as burning errors or compatibility issues with certain DVD players. If you encounter any problems, refer to the “Troubleshooting DVD Flick” section of this guide for solutions.
In summary, DVD Flick makes it easy to create custom DVDs and burn them onto discs. With just a few clicks, you can finalize your work and enjoy your custom DVD project with friends and family.
Troubleshooting DVD Flick: Common Issues and Solutions
DVD Flick is undoubtedly a great tool to create custom DVDs, but like any software, it can encounter some common issues. Don’t worry; we’ve got you covered! Here are some of the most common problems users face.
Issue 1: DVD Flick Crashes While Encoding
If it crashes during the encoding process, it could be due to a lack of memory. To solve this problem, try closing other applications running on your computer. You can also reduce the number of videos in the project or increase the virtual memory allocation for your system.
Issue 2: DVD Playback Issue
If you’re having trouble playing your burned DVDs, check if they are compatible with your DVD player. Some older DVD players may not be able to play DVDs created using newer codecs like H.264. In that case, you may have to choose an older codec like MPEG-2. Also, make sure that your DVD player supports the disc format you used to burn the DVD.
Issue 3: Audio Syncing Issue
If you notice that the audio is out of sync with the video, it could be due to a difference in the frame rate of the audio and video files. To fix this, try converting the audio file to match the same frame rate as the video file. Alternatively, you could set the “Delay” option under the audio track settings to adjust the syncing manually.
Issue 4: No Audio on Burned DVDs
If you’re not getting any sound when playing the burned DVD, it could be due to an incorrect audio format. Check that the audio files you imported are in a supported format such as MP3, AC3, or WAV. Also, make sure that you’ve selected the correct audio stream under the DVD project settings.
In conclusion, troubleshooting common issues in DVD Flick can be quite easy if you know what to look for and how to fix them. By using the tips mentioned above, you can overcome most of the common problems faced by users All in all, compared with other DVD tools like DVDFab, WinxDVD, Leawo, MakeMKV, etc. it it a simple and useful tool to create DVD.
Conclusion
In addition to its user-friendly interface and powerful features, DVD Flick is also free and open-source software, making it an excellent option for those who want to save money while still creating high-quality DVDs.
Thank you for reading The Ultimate Guide to Using DVD Flick. We hope that you found this content informative and helpful, and that you’re now ready to start creating your custom DVDs with confidence!